
Details
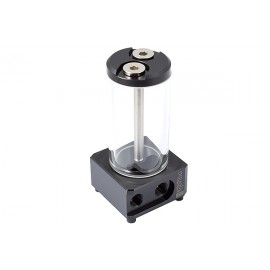
The Aquacomputer Aqualis ECO 880 mL | Nano Coated is a tube reservoir for 880 ml with a borosilicate glass tube whose nano coating will cause water to roll off its inner surface. The tube sits between a Delrin base and top, and there is no pump or pump top.
Properties
- Capacity
- 880 ml
- Tube
- borosilicate glass, nano coating on the inner surface
- Base and top
- Delrin
- Pump
- none, for a separate pump
Borosilicate glass with nano coating
Every reservoir of the aqualis series is equipped with a borosilicate glass tube, where tube reservoirs often use acrylic glass. In contrast, Aquacomputer says, borosilicate glass is extremely hard and scratch-resistant and features superb thermal and chemical resistance with a very low thermal expansion. The smaller 100 ml and 150 ml variants of the series have a tube with an outer diameter of 50 mm and a wall thickness of 5 mm. Most variants are also available with a nano coating, and this is one that has it.
Fountain effect or lateral return
Base and top are made from Delrin. For the fountain effect, the return line is connected to the central connector of the reservoir and the suction line to one of the lateral connectors. A supplied sealing screw closes the unused connection thread. The acrylic plate, pre-installed upon delivery, reduces air ingestion.
Alternatively, both return line and suction line go to the lateral connectors and the central connection thread is sealed. The acrylic plate and its spacers then come out (two screws). The stainless steel deflector plate is installed above the return channel, at the bore hole of the return line, with two M3 x 8 mm screws. It is there to effectively remove air from the water circuit.
An M6 thread in the base part makes filling easier, because a small fraction of coolant can flow from the base part directly into the reservoir. If desired, the supplied headless screw seals it.
ECO, PRO and XT variants
This ECO version has neither the acrylic window nor the LED mounting of its siblings. In the aqualis PRO and XT, up to six LEDs (5 mm size) can be installed into the base part, and the base part has an acrylic window.
The Aqualis XT variants additionally feature an electronic fill level sensor with USB and aquabus interface, a programmable alarm output and an external temperature sensor input. The aquasuite software for monitoring and configuration can be downloaded free of charge. In addition to USB, the 4-pin aquabus interface can directly connect the sensor to an aquaero 5 or 6 controller (not included in delivery). The alarm output can be configured as an rpm signal for a fan connector with fault detection (for example motherboard fan headers), or used as a switched output, for example to connect a LED. Fill level and the temperature input, which is compatible with all Aqua Computer temperature sensors, can each raise an alarm.
Many reservoirs are also available with pump top adapters and pumps pre-installed.
What the loop needs
Each connector you use takes a fitting from our fittings section, and a separate pump from our pumps section moves the coolant. The stainless steel bracket fastens to the reservoir with two M3 x 8 mm screws, and four more M3 x 8 mm screws with nuts are supplied to mount the bracket to the PC.
Notes
- The top unscrews counter-clockwise, and then the glass tube comes out easily. It goes back on by hand with moderate force, no tools.
- Take care not to lose the gaskets, and seat them properly in their grooves in the top and base part.
- Screws in the plastic base part take light force only, so the threads are not damaged.
In the box
- 1x Reservoir
- Hardware and Accessories
The installation manual for the aqualis 450/880 ECO, PRO and XT covers disassembly, both return line setups and the bracket.